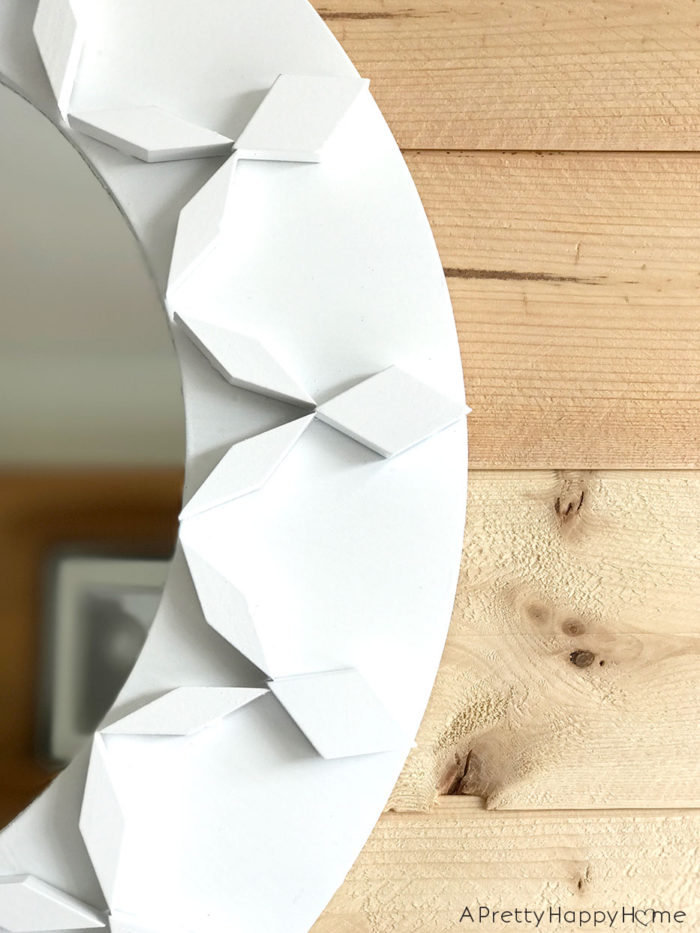
DIY Geometric Mirror Using Children’s Blocks
A friend and I were discussing DIY fails the other day. Always a cheery topic.
The reality of my life is that some projects turn out and others…not so much.
She mentioned that IF I have flops, I don’t share them on the ol’ blog.
Well, duh! I don’t share pictures of the gravity-defying things my hair does when I wake up in the morning either. But maybe I should. It would certainly shock and awe.
I do try to share the foibles that inevitably come with most of my projects though.
Today I’m sharing a project FILLED with foibles. It’s cup runneth over with what NOT to do.
But if you stand about 10-feet back and squint one eye at the finished product, you might say, “Dang! That looks sweet!” If I’m being brutally honest, a lot of days, that’s good enough for me.
Here’s how the project started…
My daughter has had the same small mirror in her bedroom for practically her entire life. It’s not a good mirror. It has a cheap frame around it and the finish was made worse by me letting a 5-year-old “help” paint the mirror from pink to purple. If you haven’t let a 5-year-old help you paint yet, you’re smarter than me really missing out.
A combination of time, a few moves, cheap construction and a bad paint job made the mirror less than ideal.
This is, to me, what makes a mirror a good candidate for a DIY experiment. One of those crafty ideas you’re not sure will work, but if it did work I would be sure to humble brag about it it would be pretty amazing.
My crafty idea was to see if I could use these children’s geometric blocks![]() to makeover the mirror. Pretty much every preschool classroom on the planet (I hardly ever exaggerate) has a set of these wooden pattern blocks.
to makeover the mirror. Pretty much every preschool classroom on the planet (I hardly ever exaggerate) has a set of these wooden pattern blocks.

![]()
My kids loved them so much at school that I bought a set for home use. The kiddos hardly ever used them at home, of course have outgrown the wood blocks, but they are really cool!
Just the wrong color for what I had in mind.
Here’s some more brutal honesty. When my DIY projects flop, it’s usually because I lack the attention-to-detail the project requires. Meticulous measuring? Not my thing. Fine precision? Not my thing. More than 3 steps? Not my thing.
If I had calculated the trajectory to the moon, you would have ended up on Jupiter instead. I would have said, “Ah, close enough! At least you made it to space! I was worried there for a second when you blasted off!”
But I digress.
I started out by playing around with the various shapes trying to see what might look interesting and what might actually fit on the mirror frame.
Then I drew a template and traced it onto the mirror frame. So far, so good.
But! There’s always a but.
It ended up being just a tad off.

If you are a perfectionist you might want to skip over this next part.
Instead of starting over and redrawing the template, I just fudged the blocks a little to make it work.
Classic me.
Adhering the blocks to the mirror frame was a bit tricky. They are slippery little suckers! It was hard to keep them in an exact position. That’s why I decided to use hot glue. Once I attached them, they weren’t going to move.
Hot glue has three downsides for this project
1. Once I attached the blocks, they were weren’t going to move. HA! It was good if I put the block down in the exact right position. It was bad if I didn’t. Please refer to the above list of why my projects flop for an indication of how well this part of the process went.
2. If anything happens to the mirror – Say it gets a hard jolt while falling off the temporary place you’ve hung it, some of the shapes can easily pop off. Yes, this happened to me! And it wasn’t immediately after hanging it. It was 20 minutes later after I’d done the victory dance. I just had to shake my head when I heard the crash.
3) The glob of hot glue raises the blocks up ever-so-slightly. It’s not noticeable until you go to paint the mirror and realize it doesn’t have a clean finish because a shape here and there is slightly higher than another one.
(I think the below picture is from before I glued everything down because it looks wonkier than the final version. Wonkier is a technical DIY term.)

After the blocks were glued onto the mirror frame, I taped off the mirror surface so I could spray paint the frame and finally finish this project!
In hindsight (and by hindsight I mean immediately after I started painting), I would have painted the frame and the blocks separately.
It was a pain to get the spray paint in all the nooks and crannies of this project. And if a block falls off, then you have an unpainted surface underneath and special care has to be made to replace the block in the exact same position.
It also made it difficult to sand any imperfections between paint coats. By imperfections I mean the dust particles or bugs that landed on the mirror. So. many. bugs.

By the way, when the blocks fell off, I had the opportunity (see how I made that a positive thing?) to reattach them with an all-purpose, heavy duty glue.
In small batches, this approach seemed to work well and those blocks are much more secure now. Lesson learned.

I’m laying it bare with how this project went because I want you to know that DIY projects (mine and I’m willing to bet most people’s) are not picture perfect processes. Things happen. Mistakes are made. This particular project had more hiccups than most.
But! There’s always a but!
That’s how I learn. Fail. Try Again. Fail. Adjust. Readjust. Tweak. Improve.
It can be hard to go through that process in the public eye. No one wants to share how their freshly spray painted project got attacked by a swarm of gnats because they left it outside to dry! Twice. Okay, three times.
I have to laugh at myself and not take things too seriously. It’s not like I’m sending people into space.

The Internet needs to come with a warning sign similar to the one on car mirrors. “Projects on this website/blog/social media may appear way more glamorous than real life.”
Real life DIY can be messy, imperfect and an oddly-satisfying experience.
I’m not entirely displeased with how this geometric mirror makeover ultimately turned out. Especially if I squint and stand 10-feet back from it!
Most importantly, I learned from this experience and know how to do it better next time.

And there WILL be a next time.
After all, I have an entire bucket of blocks to use up!
Happy creating, everyone!
Thank you for sharing part of your day with me! Here are some other posts you might enjoy.
Turn Building Blocks Into Christmas Ornaments
Step Stool Makeover with a Geometric Twist
*affiliate links used in this post*


2 Comments
Dawn Olsson
I’m not too sure about your process, but I like the finished product.
annisa
Never too sure about my process either! haha! Thank you!