Refinish Wood Chairs Without Power Tools
That’s right! We did indeed refinish our wood dining chairs without the help of power tools!
I know what you’re thinking.
No. We are not gluttons for punishment. Well, not in this case, anyway.
Have we lost our marbles? Possibly a few of them, but not from this project.
Refinishing the chairs was less of a big deal than I thought it was going to be. This is often the case with things I procrastinate on doing, by the way.
Since we only refinished the seats and left the legs and backs alone, the process didn’t take as long as I thought it would. Thank goodness – since we use these chairs every single day.
As you can see, our dining table and chairs are not a matched set. I like to call them coordinating.
Over time, the chair seats became more and more orange-toned. This was especially evident after I refinished the dining table 2 years ago. (see above photo)
In addition to the orange color, the finish was starting to wear in places.
This didn’t surprise me at all. The chairs are AT LEAST 15 years old and have moved with us 6 or 7 times, so it was past time for a cosmetic refresh.
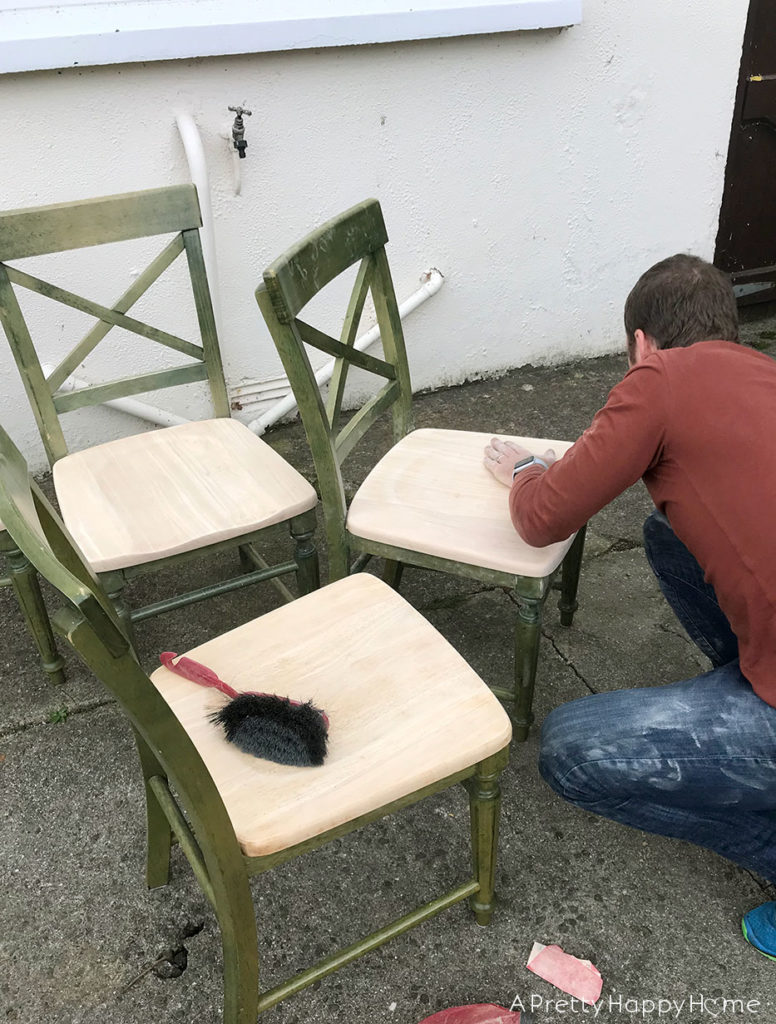
Here you can see just how orange the finish was compared to the wood’s natural color after I started sanding.
Normally, I’d use a power sander to tackle this project. I’ve used this one in the past.
However, as I may have mentioned one or a million times, we sold our power tools when we moved to Ireland. The plugs won’t work here! We have been hesitant to buy a bunch of new tools that require electricity because our visas have to be renewed each year. That leaves us feeling a bit unsettled. I don’t want to procure a bunch of stuff that I can only use here when our status still feels so temporary.
So we refinished the wood chairs the old-fashioned way – by hand! The process is so simple, even a kid can help.
To refinish your chairs by hand you are going to need sandpaper in varying grits, stain or a polycrylic protective finish and a paint brush. Also helpful: rags, vacuum or broom, sanding block and gloves.
Here are the steps we used to refinish the wood chairs:
Step 1: Use A LOT of Elbow Grease
Start by sanding the existing finish off each chair moving in the direction of the grain using the coarsest grit sandpaper you have.
Sandpaper grit is determined by a number. The lower the number the coarser the sandpaper. I started with the coarsest sandpaper I had, 60-grit, and worked up to 100-grit and then 220-grit.
Sandpaper is often sold in sheets approximately 9×11 inches in size that you’ll end up cutting down to the size you need. I was using leftover sandpaper that goes with an electric sander, which is why mine is red-colored and looks like a perfect square. No wasting around here!
If you don’t have a sanding block, you can wrap the sandpaper around any wood block. That’s what we did. This will help you get more surface area traction. For the nooks and crannies though, you’ll probably end up ditching the sanding block and just wrapping the sandpaper around your fingers. Wearing gloves can be helpful for this part to protect your fingers from any unwanted ‘exfoliation.’
Step 2: Just Keep Sanding, Just Keep Sanding
However, the gloves need to come off in order for you to feel how smooth the wood is getting. We use a handheld broom or vacuum to remove the dust as we go to constantly assess if the wood is smooth enough to stop sanding. I may or may not say, “please let it be now” an awful lot during this process.
As the finish is removed, you can switch to a higher numbered sandpaper. Now you’re in the fine tuning process of removing any grooves left by the rougher sandpaper and just getting the wood as smooth as possible.
Remember, you’re going to be sitting on these chairs – you don’t want snags and rough bits!
Step 3: Apply Stain or Clear Coat
I decided the natural wood of the chairs was what I wanted to see, so I opted not to use a stain. Instead, I applied a water-based polycrylic clear protective finish to the chair seats.
The process is pretty much the same though. First, I used a damp rag to remove any dust from the chairs and let them dry. Then I applied two thin coats of the poly with a paint brush. Three might have been better, but I was living on the edge. The polycrylic may look milky in the can, but it dries clear.
I did do a quick buff with the 220-grit sandpaper between the coats of polycrylic taking care to wipe any additional dust off when I was finished. Again, just trying to make sure the seats were as smooth as possible.
I was careful to read the directions on the can of polycrylic to make sure I allowed for the proper amount of drying time between coats. My results always tend to be better when I follow the manufacturer’s instructions! Imagine that?
Step 4: Enjoy the Finished Result
Of course I waited until the darkest days of winter to try and get photos of the chairs, but as you can see, they are no longer orange-ish!
We’ve been using the refinished chairs for a couple of months now and they are holding up beautifully to the constant use of our family! This is important because kids spill things all. the. time.
As I was assessing this project, I realized that even if I had my electric sander, I would have sanded parts of the seats by hand due to the grooves for your tush.
Also, this was a team project. Handy Husband jumped in to help and it’s a good thing he did. He’s MUCH more of a perfectionist than I am, so I credit how well the chairs turned out to having his help with the sanding. Between the two of us, it took about 2 hours to sand down the seats of 4 chairs. Not too bad!
I maybe spent another hour, not including drying time, applying the polycrylic.
For 3 hours of time and less than 20 bucks, this was a project that was a no-brainer to tackle – even without power tools.
My chairs still don’t match my table perfectly. After all, they are made of different types of wood. The important thing is I’m so much happier with how they look now. I hope my experience encourages you to try refinishing your chairs – either by hand or with power tools – too.
P.S. If you want to read about how we refinished the dining room table, click here.
*affiliate links to Amazon used in this post


6 Comments
Jauquetta
Honestly, it’s much more interesting if things DON’T MATCH! The beauty you pulled off is the harmony between these items. It would be boring if they all went together. The right amount of many notes creats a song that one note just can’t manage. Lovely, indeed.
annisa
That’s so beautiful – “a song one note just can’t manage” – and you’re right! Thank you so much for the encouragement!
Dawn Olsson
Notes and songs………I saw your piano in the window. ☹️
annisa
I KNOW! I miss it. Still trying to learn the guitar, but it’s not the same.
The Furniture Gallery
Great tutorial on refinishing wood dining chairs by hand! It’s inspiring to see how you’ve transformed them into beautiful pieces with a personal touch.
annisa
Thanks! Love the live edge table on your site!