
Stone Carriage House Gym: Part 2, Demo
If you missed it, we are expanding our home gym. This space, that I affectionately refer to as the ‘little torture chamber,’ is located in our stone Carriage House.
The part of the home gym we completed in 2024 looks like this now.

The other half of the building, where we want to expand the home gym, looked like this (see photo below) last month.
It was a tad bit creepy.
When I say creepy, I mean that’s where the cave crickets lived.
I think they are gone now. *fingers crossed*
You can catch up on why we are doing this expansion and feast your eyes on all the creepy before photos here.

Anyway, progressing with our story, we need to talk demolition. I don’t mean demo as in tearing things down to the studs. There are no wood studs in this building.
I mean demo as in prepping the walls for restoration. This is a 250-year-old stone building constructed with fieldstones, which were dug out of the nearby field and used in their natural state as the foundation and walls of the building. The fieldstone walls are held together with gravity and lime mortar. A little more gravity than lime mortar at this point. It’s fine. Gravity hasn’t failed us yet.
To restore this section of the building and make it usable, we have to remove a significant amount of the old lime mortar from the wall because it is failing. We know it’s failing because it’s falling off the wall, sometimes in little piles of sand and sometimes in big chunks. (You can see that in the above photo.)
Our goal with the lime mortar demo is to remove any mortar covering the stone faces because we want to see that gorgeous stone when this project is complete. In addition, we need to chip out an approximately 1-inch deep crevice around each and every stone that is visible on the wall face. This is the sacrificial layer of mortar protecting the inside guts of the wall.
How many stones are there? Counting would make me cry, and crying makes it really hard to see out of my safety glasses, but it’s safe to say hundreds. It’s probably higher, in the low four digits for this project, but again, we aren’t counting.
We approach this task with that steadfast companion, elbow grease. A sense of humor helps, too. It’s a tedious, slow, and physically demanding job. Sounds like a good time, right?
Oh, I forgot to mention it is one of the dirtiest jobs you can undertake. You’ll have dust in places that dust should never be. Wearing a mask and covering your skin and hair is a must. I’m doing a good job of selling this, huh? It’s a gift.
Handy Husband deeply regretted not covering his hair in the below photo. On the plus side, I got to see what he will look like with a full head of “grey” hair. Did I say earlier there were no studs in this building? I take that back.
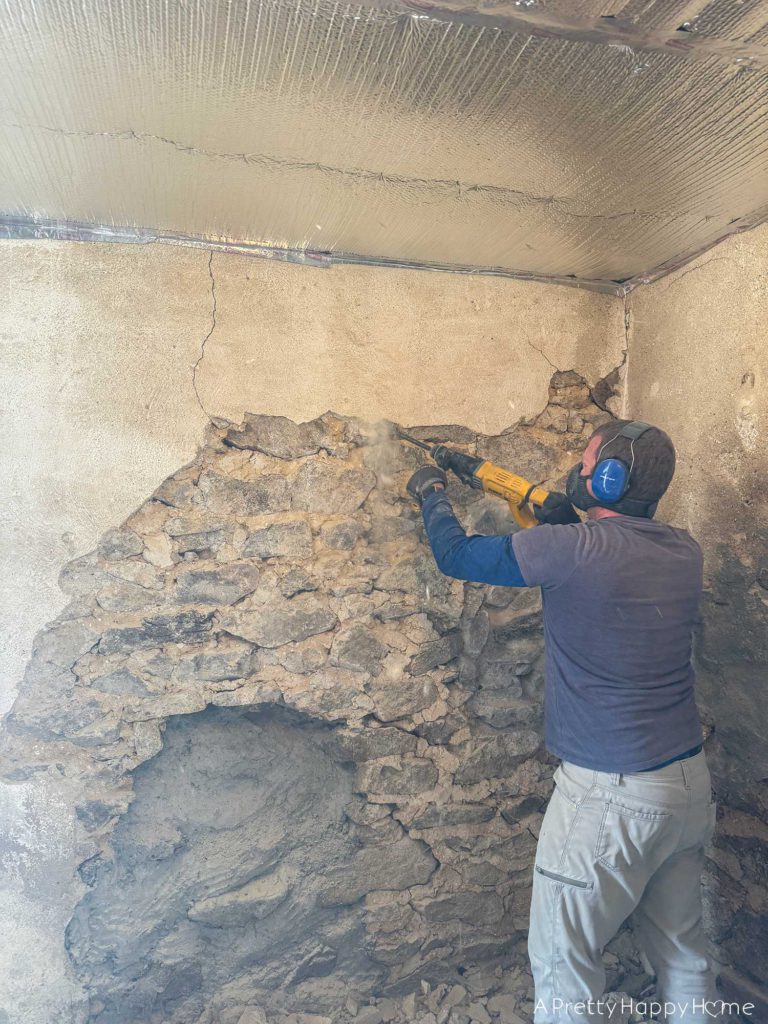
When we first started working on repointing stone foundations, we were scared to use any power tools to remove mortar from the stones. We didn’t know how the vibrations would affect the walls, and we were being overly cautious.
Caution is our friend. It keeps us from doing something dumb, like accidentally knocking down a building, and it is a part of the learning process.
As long as the stone wall or foundation is stable, we found that using the chisel attachment on our hammer drill is the most efficient way to remove the bulk of the old lime mortar. If you have concrete on your stone walls, the hammer drill with a chisel attachment is the only way to go. The concrete can be difficult to remove without the help of power tools.
It’s not a perfect solution, though. Some rocks are packed in tight, and the chisel attachment is too big to tackle those spots. That’s when we use a masonry-type hammer and a small hand chisel. If you’ve always been dying to improve your eye-hand-hammer coordination, this is the perfect task for you!
My aim isn’t that good yet, so I use the side of the hammer to tap on the chisel. It’s still effective, and I’m less likely to hit my hand over and over that way.
The other thing to remember about removing old lime mortar off the wall to prepare for the process of repointing the stones (adding new mortar) is that you need to haul away this debris. Get your shovel ready!

While doing lime mortar demo on a stone wall, you might find some interesting things in the wall.
It wasn’t unusual for horsehair to be added to lime mortar way back in the day to add strength to the mortar.
We have uncovered old pipes.
We have found voids in the wall where rodents made nests. We didn’t know whether to be repulsed or impressed by their ingenuity. Maybe a little of both? Consider yourself lucky if you don’t find a dead rodent in one of these nests. We have not been so lucky.
You might find wood from where old supports for windows or doors were located.
You might notice different layers of mortar, as evidenced by a change in the mortar color. This means the lime mortar has been repointed at some point. This is an encouraging find! You know you aren’t the only suckers that have had to do this job your home has been cared for over the years.
If you were chipping away at a wall that I constructed, you might find a time capsule. True story! I added one to our basement wall. I know how I’d feel if I found a time capsule in a wall. So would everyone else because I’d never stop talking about it. I wanted to give someone in the future a little dose of joy, so that’s why I added one in our basement.
In this room of our Carriage House, I pulled out a small bundle of folded-up newspapers that had been shoved between two rocks. Why was there a newspaper shoved in the wall? No idea.
I had hoped it was cash. You can imagine my disappointment.
This is all a long way of saying that as you remove the old lime mortar from a stone wall or foundation, the wall will reveal its secrets without answering any of your questions. So rude.

I prefer to remove all the old lime mortar from every wall that needs repointing before we start doing any repointing. It’s just less messy that way.
At a minimum, though, one entire wall needs to finish being chipped out before new mortar should be applied to that wall. Otherwise, you’ll end up disturbing the new mortar.
Speaking of cleaning, we use a shovel, a wheelbarrow, a broom, a smaller brush, and our shop vac to clean up the area we are prepping for repointing. The wall needs to be largely free of loose debris before you begin repointing.

I’ve been trying to provide a realistic glimpse of what it is like to prep a stone wall for repointing instead of sugarcoating it. But let me end on a more uplifting, encouraging note.
Yes, this project is hard and tedious.
It’s also very doable, and you have the advantage of using modern power tools. It’s also very rewarding to see the stones cleaned up and exposed, sometimes for the first time in a century! And you did that! Trust me when I say it is a satisfying feeling.
This feeling will only get better as you see the wall transform during the repointing process.
Do you have questions about removing old lime mortar from a fieldstone wall or foundation? We aren’t experts, but self-taught DIYers. However, if we can answer a question from that perspective, we will!
You can always comment on this blog post, email me here, or reach out via Instagram or Facebook.
Happy DIYing!
Some of the items we use for demoing lime mortar on a stone wall:
Cold Chisel (We use varying sizes)
DeWalt Hammer Drill (Demolition Drill would work too)
Chisel Bit for Drill (We use varying sizes)
3M WorkTunes Ear Protection With Bluetooth (I need music while I work!)
Thank you for following along with this project. We appreciate you! If you’d like another blog post to read, I’ve got you covered.
Fieldstone Porch for our Carriage House
An Epic Stone Fireplace Makeover
What We Didn’t Anticipate While Repointing Stone Walls
*affiliate links in this blog post*


You May Also Like

Updating Our Home With Antique Hardware

The Great Barn Loft Clean Out
