Arrow Growth Chart – ScrapMaster Project #1
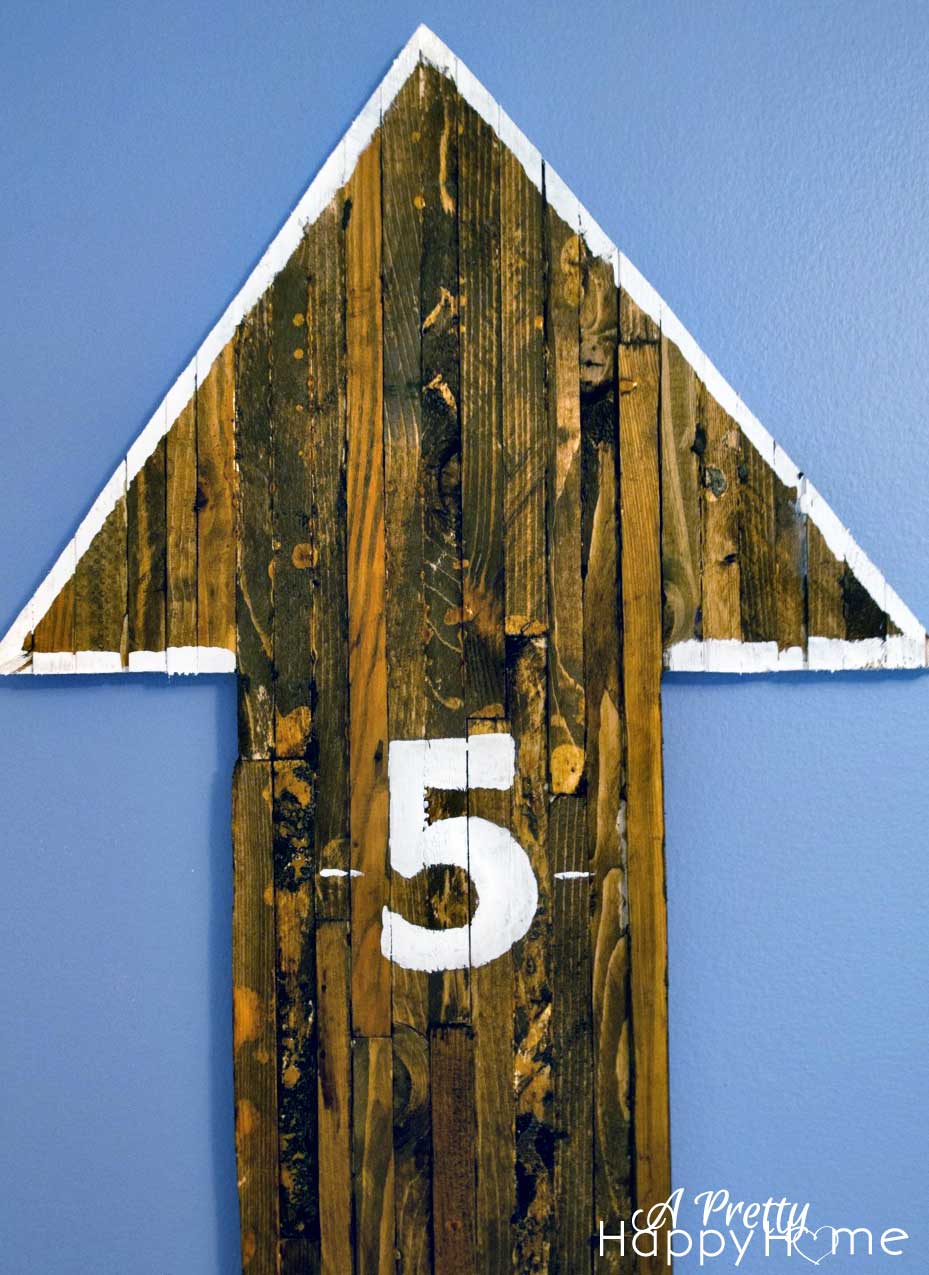
Some of the best things in life happen by accident. Would you agree? Unless you are potty-training a toddler. Then, too many bad things happen by accident… all over the floor. Thankfully, those days are mainly behind me (no pun intended). Back to the point. I’ve decided to succumb to the trend of arrow-shaped art. Better late than never, right? I will love arrow art long after it is past its trendy expiration date too. Be forewarned. So, I was working on a cool piece of arrow art for the kitchen and as I’m staining away (using my easy clean-up method), it suddenly dawns on me. Wouldn’t this be the COOLEST growth chart EVER for a little boy’s room? And then I looked around for someone to tell and it was just me and the spiders in our work room. They didn’t care. The really sad thing is that I already have a growth chart for my kids. That I made. That I love.

I don’t know if there are any original ideas left on the planet, but I will tell you how we arrived at making this arrow. I say, we, because it was a collaborative effort with the hubby. The tangent of turning it into a growth chart was aaallllll mine. He’s such a lucky guy. 😉
After all the recent bed construction (here and here), we ended up with a bit of scrap wood. Waste not, want not! I knew we could do something with it. My husband decided that it would be easier to construct one of my wild ideas if the scraps were uniform. So, he spent an hour ripping the random pieces of wood into 1 inch wide x 1 inch tall x however long pieces. Did that make sense? 1 x 1 x varying lengths. You can see a pile of them below. I now call the hubby the ScrapMaster. 🙂
He then glued the wood segments together to form a really funny rectangle of sorts. He just used clamps and wood glue. This part of the process did require more patience than I naturally have.
After the wood segments were nice and dry, I penciled out an arrow shape and the hubby used his saw to trim the funny rectangle into an arrow shape.
It is at this point in the process that you would sand the piece down.
The side that was intended for the arrow art was sanded.
However, since this growth chart side of the arrow was an accidental afterthought, it didn’t get sanded.
It’s uneven, there are some glue drips and I kind of love it more for its imperfections.
So, after the sanding (or not sanding), I stained the arrow and then used a stencil to pencil in the number outlines on the board. If I was planning on making this a growth chart, I would have made it a little taller.
In this case, I had to roll with it. I decided that I would start with the number 2 and hang the chart so that the “2” would line up to be 24 inches from the floor. My son was born at 21″, so I would still have space below the “2” to pencil in his birth height.
After that, it was just a matter of filling in each number with white paint. I used one of my craft paint brushes – they were the only ones small enough for this kind of detail work!
All in all, this part only took about 30 minutes. My wood pieces were already perfectly imperfect, so there was no need to go too overboard with filling in the numbers.
I hung the chart with three Command Strips and called my cute little model to come over so I could take his picture. Now, if only I could convince him to smile!
I am so happy that I accidentally stumbled upon this idea and decided to run with it. I love those moments when you do something purely for fun. Those moments when you have time to take an idea and run with it. Those moments when you can explore and create without restraint. I think we all need more of those moments. They feed the soul.
Here are some other scrap wood projects! Woohoo!
*affiliate links in this post*
Linking up!


7 Comments
maria
Annisa! You and your projects and your writing are AWESOME!
annisa
Well, that made my whole day! Thank you!
Pingback:
lorraine
are you sure that its 24 inches from the floor
annisa
Not sure! It’s not on the wall anymore since we just moved. 🙂
Pingback:
Pingback: