Dave’s Killer Bread – Updated CopyCat Recipe
I’ve been making a copycat version of Dave’s Killer Bread at least once a week for about a year now. Holy smokes. My 20-something self would never believe I’ve become so handy in the kitchen. My 30-something self hardly believes it either!
I am in no way an expert on all things related to bread making. I’m learning as I go and sharing the journey. Case in point: this bread incident.
A few months ago, I had the opportunity to get my fix of the real Dave’s Killer Bread while visiting the Pacific Northwest. Since then, I’ve been tweaking the recipe ever so slightly to try and get it even closer to the original.

I think the hardest thing to mimic is the texture or consistency of commercially baked bread with homemade bread. There are processes and preservatives that we don’t have in our everyday kitchens. Not that it stops me from trying!
Besides, if I don’t keep baking bread, I won’t have anything to eat for breakfast. Or lunch. Okay, sometimes dinner. But, that’s where I draw the line. 🙂

Here’s what I’ve done:
1. To make the recipe slightly sweeter, I’ve been using 3 GENEROUS Tablespoons each of molasses and honey. This is an increase of 1 Tablespoon of molasses from what I started out using. If a little extra drips into the bowl, I’m not complaining. And if you run out of one or the other when you are baking, just substitute the other – I’ve done it and it works fine.
2. I’ve increased the vital wheat gluten to 1/2 cup from 1/4 cup. You can make this recipe without it and it will be just fine, but I think it does help texture-wise.

3. To try and eliminate the variations in my bread outcomes (rising, not rising, lighter, heavier, etc.), I’ve become more careful about how I have been measuring the flour. Crazy, I know.
I’ve been sifting my flour and then using the spoon method to measure each cup. So, I scoop up the sifted flour with a spoon and empty it into the measuring cup. When the cup is full, I use the back of a butter knife to level it off.
I’m sure in a commercial bakery they are weighing the ingredients to maintain accuracy. I’m not that sophisticated in my kitchen and I have a super humid climate to deal with, so the amount of flour I use varies. The important thing is that you measure the flour the exact same way every time you make the recipe – at least, that’s my current theory!

4. To help deal with the humidity and the extra liquid I’ve added to the recipe, I’ve lowered the water content to 2 cups instead of 2 1/4 cups. Even with the lowered water amount and the increased vital wheat gluten, I still have to add more than 4 cups of flour each time I make the recipe. That’s why there’s an asterisk on the amount of wheat flour to use on the recipe below.
Well, we are down to 3 slices of bread, so I’m signing off now to get my hands happily goo’d up with bread dough! I hope you like this recipe and I’m super thankful for the original creator who did all of the heavy lifting! Happy baking!
Dave’s Killer Bread UPDATED Copycat Recipe
(Based on the recipe by the brilliant Kitchen Wench)
Ingredients:
2 cups of warm water
2 Tablespoons yeast
2 Tablespoons coconut oil
3 Tablespoons molasses
3 Tablespoons honey
1 Tablespoon kosher salt (use whatever salt you have)
1/2 cup vital wheat gluten
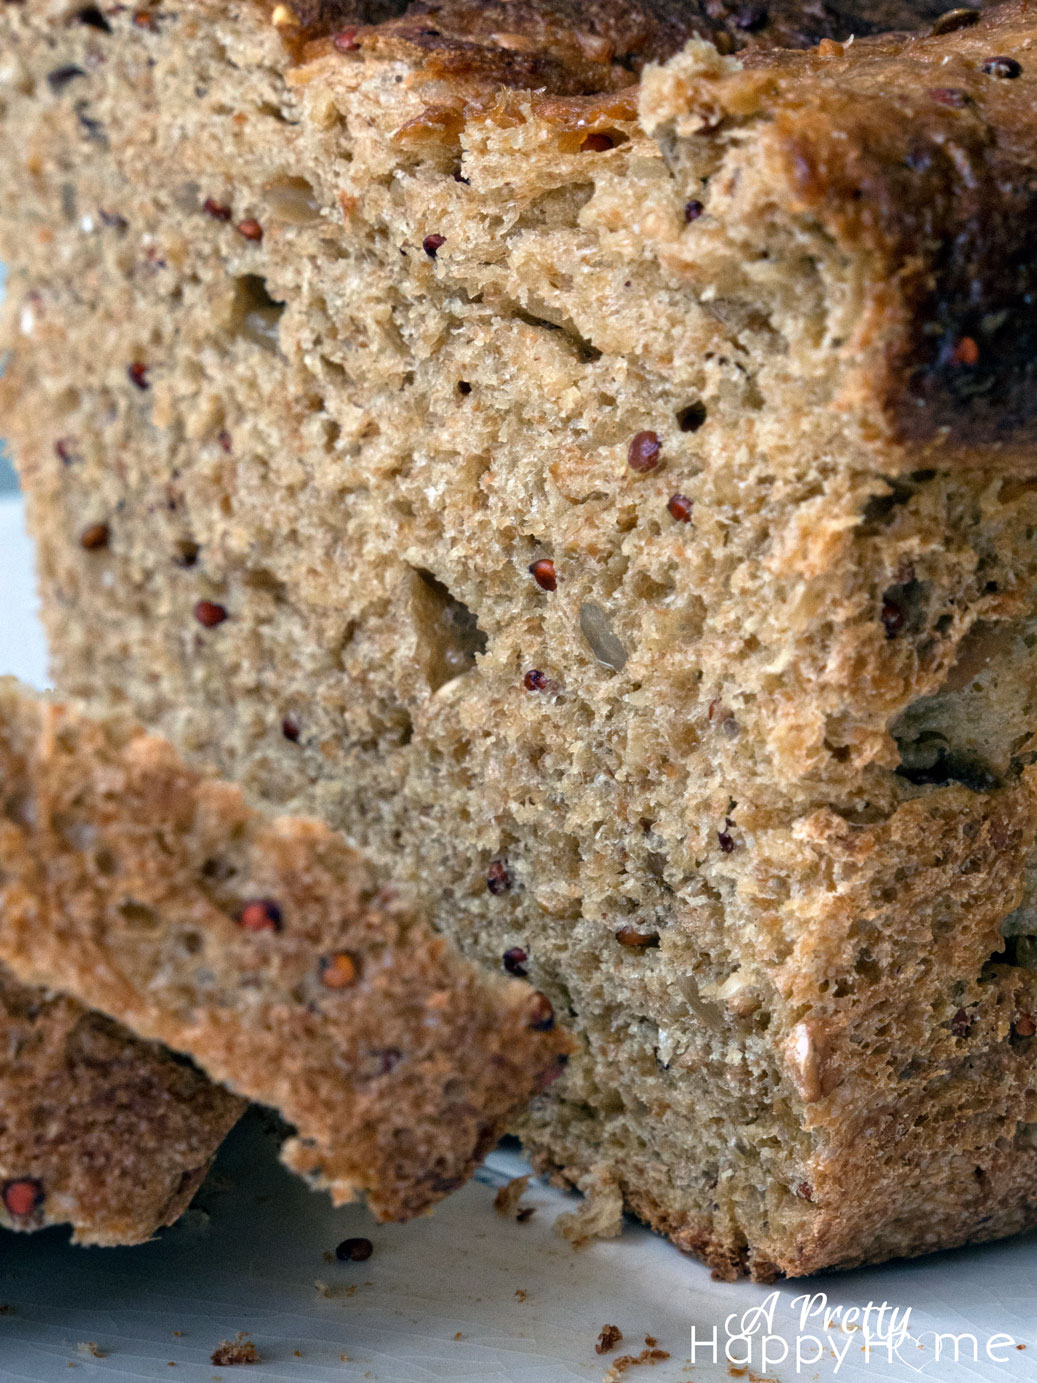
1/4 cup quinoa
1/4 cup flax seed
1/4 cup sunflower seeds
1/4 cup long cooking oats (quick cooking oatmeal would be fine if that’s all you have)
1/4 cup steel cut oats
2 cups white flour
2 – 3 cups wheat flour*
olive oil for drizzling
extra honey for drizzling
Fill large bowl with warm water. Ideally, it will be 115 degrees Fahrenheit. Sprinkle the yeast on top of the water and let set for 5 – 10 minutes so the yeast can start working. I use this time to get out my other ingredients and by then, it should be good to go.
Add coconut oil, honey, molasses and salt to the water/yeast mixture. Give it a quick, gentle stir with a fork to break up the coconut oil (it usually comes as a solid).
Add in the oats, sunflower seeds, flax seed, quinoa and wheat gluten. Give it another gentle stir to combine.
Add in 2 cups of the white flour and 2 cups of the wheat flour. *SET ASIDE THE REMAINING CUP OF WHEAT FLOUR. (You may or may not need it depending on the humidity in your area. Some days I only need a quarter cup extra, some days I need the entire cup of flour.) Stir in the flour with a fork and then begin working the dough with your hands. If the dough remains sticky after you’ve kneaded it several times, start sprinkling a little bit of your reserved cup of flour in the bowl. Work the additional flour in with your hands. I can tell it is done when it has a more play-doh like texture – pliable, but not too sticky. You definitely do not want it goopy, but you don’t want it too dry either. (It might take 5 – 10 minutes of kneading and working in flour before mine is the right consistency.)
When the texture of the dough is ready, form the dough into a ball. Drizzle a little olive oil in the bottom of the bowl for the dough to rest on and drizzle a little on top of the dough. Smear around with your fingers so the entire dough ball is lightly coated.
Cover the dough and let it rise until it has approximately doubled in size.
Punch down dough and knead it out for 3 to 5 minutes. You’re trying to work all of the air bubbles out of the dough. (You can experiment with kneading it for shorter or longer periods of time. I’m still figuring this part out.)
Recover the dough and let it rise again until the dough is approximately doubled in size.
Punch the dough out and again knead the dough for 3 to 5 minutes. Select half of the dough and form it into a loaf-like shape. Place it into a greased bread pan (cooking spray works too). Do the same with the other half of the dough. Drizzle a little olive oil and honey on top of the loaf. (I rub it around gently with my fingers to lightly coat the entire top of the loaf.) Cover both bread pans and let the dough rise until it peeks over the top of the pan. Meanwhile, preheat your oven to 425 degrees.
When the dough is done rising, place it in the oven to bake for 30 minutes at 425 degrees. Check at the 15 minute mark and cover lightly with foil if need be so the bread doesn’t get too dark on top. When finished baking, remove bread from pan promptly and let cool on a baking rack.
Pat yourself on the back for being so freaking awesome. You just made fresh, homemade bread! How many of your friends can do that?
TIPS:
1) I let my bread rise in the microwave. It is the only place in my house that isn’t too drafty or too cool. I also usually place a hot pack (you know those ones that you can heat up in the microwave to keep casseroles warm during transport) under it. This step is totally not necessary, just something you can try if your bread isn’t rising.
2) I’ve never had to adjust my recipes due to humidity in the air before. So, I am learning. You could always decrease the amount of water in this recipe or like me, just add a little more flour.
3) If you want to go 100% whole wheat, go for it! My family prefers the split version of white and wheat flour as it tends to be lighter in texture. Do what ever suits your tastebuds.
4) Flax seed comes whole or milled. I prefer the taste in the recipe of the whole seed. I haven’t seen a difference whether you use the golden flax seed or the darker variety.
5) I’m sure that most baking recipes that call for sunflower seeds use the unsalted version. I use whatever version I have on hand. I’m not a stickler for the rules here!
6) I end up freezing both loaves of bread. When the bread is completely cooled, I slice up the entire loaf and put it in a gallon-size freezer bag and place in the freezer. That way, we can pull out just a slice or two as we need it and the bread doesn’t go to waste. If you are using the bread for sandwiches, it only takes a few minutes for a slice of bread to thaw.
*affiliate links in this post*
If you enjoy bread as much as I do, you might like one of these too!


84 Comments
Pingback:
Pingback:
Linda
Thank you for sharing your efforts! I currently bake our own bread, but havealways baked white bread and never ventured to the wheat and grains. We loveDaves breads (live in Oregon), but it’s spendy, and I love to bake it myself. I have all the ingredients now, and today is the day to try your recipe – wish me luck!
Oh, one question. I don’t want it too sweet, so should I use your former amounts of molasses and honey?
annisa
Yay! I hope it goes well. This has been a fun learning experience for me, so if you have tips for me, let me know! I really don’t think that even with the additional tablespoon of honey and/or molasses that you’ll think this is a sweet bread. I’d go with the updated amounts. You could omit drizzling honey on top of the bread prior to making it though. Lately I’ve had some unsweetened coconut that I need to use up and I’ve been throwing a little of that in the recipe, so it’s a really forgiving recipe and customizable to what you enjoy. Good luck! I hope it turns out! 🙂
Linda
It is wonderful!!!
My hubby is very impressed, and the only thing I’ll do different is to turn my oven down a pinch – even with the foil the last 15 min,, it got a bit too dark. I should have known as my oven does run a tad hot. Im having toast with it right now 🙂
So, now my sis wants your website, and I’ll give mom the second loaf to enjoy.
Thank you again!
annisa
WOOHOO!! That’s awesome! I’m so glad it turned out. Thanks for making my day. 🙂
Mary Flickinger
Please please show your flour weight in metric, it’s not as scary as cup measures that can be widely off the mark in either direction and make a difference in success or failure for new bakers. I’ve learned that my cup measures never came out accurate and when I first began baking bread I didn’t have the skills to know how to adjust the dough. Thank you so much for considering my suggestion.
Your bread recipes are amazing and your instructions and tips are great 👍
quilterpt
Found your recipe and have been playing with it myself. Already had decreased the water as I did by mistake and it turned out fine, so am down to the 2 cups as well. I have been putting everything in my bread machine and taking it out at the dough stage. It rises very quickly, even with just the 1/4 c. gluten, so am pleased. It does brown really fast in the oven though, so wondering if a slightly cooler (400 degree) oven would help this? Even with the foil on at 7 min of cooking the tops got really brown. Thanks for a great recipe!
annisa
It might! If you try it at 400 degrees, let me know! I’d be curious to learn if it affects the browning much. I’ve had two different ovens since trying this recipe, so I know it has a little to do with the oven and a little to do with how much oil I put on top before baking. The more heavy-handed, the more quickly it browns. The sweet spot for my oven right now is somewhere around 10 minutes. My last oven, I could go all the way to 15 and still be fine. Glad you enjoyed the recipe! Happy baking!
Pingback:
Pingback:
Ruth
I love Daves “good seed” in particular… Which one were you trying to duplicate?
annisa
I think I mentioned that it is hard to truly make a homemade bread taste exactly like a commercially baked bread. With that said, I’d say it’s closer to Blues Bread. The recipe is pretty adaptable though, so you can add more seed-type ingredients to make it closer to the taste you are aiming for. Good luck!
jenny
Thanks so much for posting the recipe i make bread often but still sometimes buy Dave’s as a treat since it’s delish !!! so i was excited to try your recipe and it is delish too! : )
– I made a few modifications, i only used 1/4 cup vital gluten sometimes i find more makes bread too chewy for my taste, especially if it’s a 50/50 white/whole wheat ratio. I also added in a “soak” time, i had read on a few other sites that is the secret to Dave’s bread- so followed the steps up to where you add the flour at that point i added 1 cup of white and 1 cup of whole wheat and let that mix for a good 5 mins, then covered with a towel and let sit for at least 90 min (i think longer would be even better for flavor development) after 90 mins it was very puffy, i added the rest of the flour, 1 cup white 1.5 cup whole wheat, and then gave a good long knead in the mixer, about 15 mins. Then I continued on with the recipe as stated. I felt the heat would be too high so I set my oven to 400 and baked for 26 minutes ( both loaves browned perfectly and had internal temp of 190 ).
thanks again!
annisa
This is AWESOME!! I am so stoked to hear about your experiment. I have to try the soak time! I might have to get a mixer if I want to do 15 minutes of kneading though…OY, the arms!! Wouldn’t it be fun to do different taste tests?
Mary Jqne Heros
Are the steel cut oats cooked?
annisa
Hi – No. All the ingredients – oats, quinoa, etc. – go into the recipe raw. There’s enough moisture in the bread to make it all work out in the baking process. Good luck!
Pam
HI Annisa, what size bread pans did you use? I used 5 by 9 and the dough didn’t rise to the top of those pans after an hour rising, so thinking that I used the wrong size pan I went ahead and baked them as instructed. They are flat on top and less than 2 inches tall! I used my stand mixer with dough hook to knead instead of by hand, that is the only thing I did not follow! I wonder what to do differently next time, can you suggest?
annisa
Hey! That’s a bummer! I have not used a stand mixer, but if anything, I think that would have done a better job. Ha! I’m not sure though.
I do use normal size bread loaf pans, which I think are 5x9ish.
It sounds like something went wrong with your yeast. Did the loaves rise to the top of your bowl for all of the other risings within a decent amount of time? I can usually tell if something has gone wrong with my yeast even if it seems to be rising “okay” before I put it in the loaf pans, as the dough will feel tough to work with, if that makes sense. It won’t have that ‘give’ and ‘bounce back’ when I’m kneading it.
Unless temperature and humidity are just absolutely perfect, my dough will usually, at a minimum, rise to the top or just above the top of the pan and be slightly rounded. It is harder to achieve this if I’ve gone extra heavy with the whole wheat flour in the recipe. Whole wheat flour absorbs moisture differently and can produce denser breads.
Those are my initial thoughts… I wish it was a slam dunk for you the first time out of the oven! I made my weekly batch today and it makes the kitchen smell so darn good!
Sara
Hello! We love Dave’s Bread, but with 6 kiddos, it’s an expensive habit! Have you worked out an estimated cost per loaf? Thanks!
annisa
Hi! I know! Dave’s can be SO expensive. Long story short, no, I have not calculated the cost. If you factor in your time, it’s probably never worth it, right? I do like knowing what goes into my bread though and I’ve found this bread is versatile. If you cut out some of the random ingredients, like vital wheat gluten, you can cut the cost down. Or only use ingredients that you would normally keep on hand. For instance, if you don’t eat steel cut oats regularly, then omit that ingredient and just double up on the regular oatmeal. I don’t like buying a special ingredient just for one recipe. Also, I’ve been adding sunflower seeds lately because I found them on sale. So, I can add or omit ingredients with this recipe, customizing it to what’s on sale or in my pantry and it seems to turn out just fine!
sara
Thank you! My 10 year old daughter loves to bake, so it shouldn’t take much of my time 🙂 I think I can make a regular wheat loaf for $1.00, so even with the extra ingredients, it shouldn’t be more that the store price.
annisa
The recipe should make 2 loaves…so factor that in. Good luck!!
Rick
I use 2 1/4 cups water and 4 1/2-4 3/4 cups flour (2 cups unbleached white)…
Curious what size loaf pan is being used? On the second rise mine will barely rise to level in a 9×5 loaf pan. Should I use an 8×5 to get a higher raise? Just wondering if it me or the pan size.
Thank you
annisa
Hey! I just went and looked at my pans. I think they are 9×5, that’s standard, right? It doesn’t say the dimensions – they are a Pyrex, but they do say 1.5 Qt. I do the first and second rise in the bread bowl and then I split the dough in half and transfer it to the bread pans for the third rise. Mine definitely clear the bread pan, but I’m having them do that rise (and all of the rises) on a heated pan in the microwave where I can control the air temperature. If my kitchen is drafty and cool, I have a heck of a time getting it to rise, so that’s why I went to the microwave. Not sure if that helps…
Tabata
Does anyone know how much it costs to make this bread??
annisa
I’m not quite sure – I just enjoy making it, but I should probably try to figure it out one day. But the previous commenter might know. She had her regular white bread down to around a buck per loaf. The ingredient list is flexible though, so that can help!
Pingback:
Pingback:
Pingback:
Kaitlin
Can this be made in a bread machine instead?
annisa
I don’t see why not. I haven’t tried it though. You could also try the mixing part in the machine and then the baking in the oven. Let me know if it works!
Pingback:
Pingback:
Pingback:
Ariel
How long do you typically let it rest between kneading/before baking?? I’m a first time bread baker and need to know if this is something to be done between errands, or if I should be home all day! Thanks!
annisa
I usually allow 3 – 4 hours for the entire process – from start to pulling it out of the oven. Honestly, it depends on how fast your dough is rising whether it is closer to 3 or 4 hours. If your house (or the area where your bread is rising) is warm, the dough can double in size in 30 – 40 minutes. If it’s a bit cooler or if you get distracted like I sometimes do, it might be an hour before the dough has doubled in size. If you have a quick errand to do, you can probably fit it in. Good luck! I hope you enjoy bread making and stick with it! It took me awhile before I got the hang of it, but now it’s something I enjoy doing and eating!
Ariel
Wonderful, thank you so much! Very excited, it’s something my boyfriend has been asking for for almost a year, so I figured it’s now or never!
Cheyenne McEwan
If I wanted to make the dVes killer white bread would I just use all white flour? Or a white whole wheat?
annisa
Hi! You can use regular all purpose flour or bread flour and skip any type of whole wheat flour. I think it actually makes the bread rise a little easier without the whole wheat flour.
So instead of 2 cups whole wheat/2 cups all purpose/bread flour use 4 cups of all purpose or bread flour. Hope that helps!
Pingback:
Pingback:
Carolyn
Hi, I’ve been baking this recipe for about a year now, thank you so much! I’m curious why you let it rise twice before putting it in the loaf pan for the final rise?
annisa
Hi~ I am ridiculously happy to hear this! Glad it is working out for you! Honestly, I did the number of rises because the original recipe that I modified mine off of used that number of rises. The number of rises should decrease the size of the air bubbles, improve texture, make the bread less crumbly, etc. However, one two many rises can ruin the texture too. With the number of chunky ingredients in this bread, I thought it was safest to continue this method. I have definitely rushed that second rise though when I’m in a hurry. Maybe it doesn’t need that middle rise though? Maybe I should try it and see? Or if you try it, let me know. It would be great feedback for others and could save at least 30 minutes? This dough has been very forgiving to me as I’ve learned how to make bread, changed ingredients on the fly, rushed the process, etc. I’m thankful for that! And thankful for folks like you that help make a recipe even better!
Aly
I am a bread baker and picked up a trick from America’s Test Kitchen a couple of years ago when making whole wheat bread. It has been a real eye opener to get a lighter wheat bread. Whole wheat flour has sharp edges and when you knead the bread the sharp edges of the whole wheat cut the gluten strands as they are forming. Hence you end up with a dense loaf with less lift power. In the recipe by America’s Test Kitchen they soaked the wheat flour overnight in milk. This allowed the wheat flour to soften up and the edges become less sharp. I was skeptical but darn it really works. My wheat bread no longer is a led sinker. You may want to check this out.
annisa
This is fascinating! Holy cow. Okay. I’m going to check this out. You are a gem for sharing this tip.
Kaydeej
Does it have to be coconut oil? I have to buy all ingredients at once and am, uh, financially challenged at this time
annisa
Hi. I totally understand! I haven’t tried substituting the coconut oil, but I think it could be done with a vegetable oil.
Aly
Any oil like olive or vegetable oil, melted butter will work as well.
annisa
You’re definitely correct! Butter should be good. I was thinking olive oil could possibly lend an additional flavor, but maybe not since the quantity is so low? The bread just needs some sort of fat. And I’ve found this recipe to be very forgiving.
Aly
I make bread all the time, in fact I did a fund-raiser in October and baked over 50 loaves during the month. I find bread to be very forgiving, as long as you use good ingredients and fresh yeast. I buy my yeast by the pound and keep it refrigerated. Even though it is rapid acting yeast I always bloom it before adding to the bread with warm water and a little sugar or honey. I use a lot of local honey which I get at my local farmers market. Honey is a natural preservative as is fat and eggs. Even my white bread is good to use up to a week after baking. Very lean doughs without fat, eggs or sugars usually need to be used within 24 hours of baking or ideally eaten the day they are baked.
annisa
Holy cow! 50 loaves! That’s amazing. What a neat idea for a fundraiser. Have you experienced or read anything about people living in areas with SUPER hard water having it affect their yeast performance? We moved recently and I think I’m dealing with that now. I have to use Borax in our washing machine and even with the Brita water filter, our coffee maker needs to be cleaned every couple of weeks. I’ve switched to bottled water for yeast breads and have much better results, but it’s annoying to need one more ingredient.
Aly
We have very hard water here as well NC. I use a lot of low fat milk (1-2%) in my bread, it acts as a preservative and I don’t have to worry about the hard water. If you are using bottled water use filtered water (like a Desani) and not a spring water like Deer Park, again higher in minerals… I run all my water through a Brita, even for the dogs (recommended by my vet). If you are feeding sourdough starter use bottled water as there is clorine in tap water and the yeast does not like it. I bake bread all the time and once in a while have a stinker but not very often. Hint for you, read the article in Cooks Illustrated about Whole Wheat Bread. Very interesting and their trick works. I usually had a bit of a door stop/brick consistency with whole grain breads. They have you soak the whole wheat over night in milk (you will also make a Biga starter) The thought process is that whole grains have sharp edges and as you go to form gluten in your kneading the sharp edges cut the gluten, shortening the strands. It does produce a much lighter loaf. I also love cooked steel cut oats in my oatmeal bread. Here is the recipe:
Steel Cut Oatmeal Bread
2 c. cooked steel cut oats (I cook in a mix of milk and water)
1 stick butter, melted into the hot oats and mixed until room temperature
2 eggs
1 c. warm water
1 1/2 tab. yeast
2 tab maple syrup or honey
2 tea. salt
5-6 c. King Arthur bread flour (I don’t measure, every time is different)
I cook the oats and add in warm to the bowl of my kitchen aid mixer. Add in 1 stick butter (salted, use less salt later) and mix until butter is melted and oatmeal has cooled to room temperature. Meanwhile in a 2 c. measuring cup add warm water, yeast, and sugars and bloom the yeast until foamy. With a hook mix in the eggs to the oatmeal mixture. Add yeast into the oatmeal mixture and put mixer on low Add in 4-5 scoops of flour and mix a couple of minutes. Keep adding flour, scraping sides until the dough pulls away from the sides and a smooth dough forms. Using the dough hook mix 5-6 minutes then add in the salt. Mix another 4 minutes or so. (you can add in a little more flour if dough gets sticky. Turn out onto a floured counter and knead until smooth and soft. Place in a greased bowl, cover and let rise 2 times, gently deflating after the dough doubles each time. I use a scale and use about 1- 1.2 lbs lb. dough in a standard dark metal loaf pan. Spray bread pan with non-stick and form dough into a smooth, even log. Cover with plastic and let rise until just 1 ” over edge of pan, usually about 40 min-1 hr. Preheat oven to 350 F. Brush top of loaves with egg wash an sprinkle on old-fashioned rolled oats or sesame seeds. Bake for 26 min. With instant read thermometer check internal temperature is 200 F. Allow to cool completely before slicing.
Notes: I love the maple flavor, Domino makes a maple flavored pourable sugar that is terrific.
I have also added chopped toasted walnuts or hazelnuts for a nutty oatmeal loaf.
White poppy seeds are terrific to top bread, you can find them at an Indian grocery store.
For rich white bread use 2 c. milk, 1/2 c. warm water and honey. Eliminate the oats. Makes 3 large, 4 regular loaves
We have a snow storm here today in NC and all southerners have to have bread as it is part of their snow survival kit along with milk and eggs………..
annisa
I heard about that storm! And I used to live in Georgia, so I know all about the french toast folks must be making during snowstorms. Ha! But seriously, the bread recipe sounds fantastic and I do hope the storm is the pleasant kind and not the dangerous kind.
Lwhit
I’ve never used vital wheat gluten. If I triple the recipe, do I also triple the wheat gluten?
annisa
Yes! That’s correct. I don’t have a bowl big enough to triple the recipe, so I’ve never tried it. If you can’t find the vital wheat gluten at your store, you can leave it out though. I think it does help the texture, but it won’t ruin it to not have it. You may need to add a little extra flour though to offset the moisture difference depending on how it goes.
Alyson Goroski
King Arthur bread flour is a bit higher in gluten than other flours, If not using vital wheat gluten then try using this brand of flour. I bake a lot of bread and it is the only one I use.
annisa
Alyson knows what she’s talking about! Definitely take her advice!
Tom
At the beginning of the instructions you say to fill a large bowl with warm water. This fill amount is really just the two cups of water, Correct?
I have most of the ingredients on hand from other weekly bread making and can’t wait to try this as soon as I find some quinoa.
Thanks for sharing.
annisa
Hi! I can see that would be confusing. Yes, just two cups of water, but use a large bowl so your dough has room to rise. Take care and good luck!
Briana
Love this recipe! I’ve made it at least 5 times so far. I thought the whole time I was using the wrong size loaf pan because my bread wouldn’t rise over the top. I love to bake and couldn’t figure out what I was doing wrong since it would rise beautifully the first two times. So I decided to experiment, and I think I finally got it! Here’s what I did, after kneading it and letting it double in size nicely in a WARM area (usually on top of the stove where I have other things going since I meal prep while I have the dough rising, covered with a kitchen towel), next I punch it down and knead it a little and skip the next step of letting it rise and punching it down before putting them in a loaf pan. Instead I just put it straight into my loaf pans for the second rise. So happy with the results! Thanks so much for this recipe! Im not sure if u have already answered this question but I was wondering if u could post the nutrition facts for this recipe? That would be incredibly helpful.
annisa
I’m so glad that worked out! YAY! This recipe seems to be very adaptable and forgiving for all sorts of techniques and ingredients and I appreciate that versatility. I’ve been having a hard time lately with the hardness of my water in a new house affecting yeast rise, so it is a never-ending science experiment around here! If anyone knows an easy way to calculate nutrition facts, let me know. Is there an app for that!? Ha!
Diana
Been making this recipe a couple times a month for awhile now – we love it around here! It lasts a really long time, which is nice.
Noticed a couple folks asking for nutrition info, so I figured I’d give back a bit by calculating that. According to MyFitnessPal’s recipe calculator, I get the following numbers per loaf (so divide these numbers by however many slices you cut your loaf into):
Calories: 1172
Total Fat: 30g
Cholesterol: 0g
Sodium: 1711mg
Potassium: 1229mg
Total Carbohydrates: 179g
Dietary Fiber: 19g
Sugars: 50g
Protein: 51g
Hope that helps. Thanks for the great recipe!
annisa
This is incredibly generous of you – thank you for sharing with everyone! You totally made my day!
Christine
OMG…this is the best bread I’ve ever made! Thank you so much. Amazing that is recipe was posted back in 2015 and I am just now finding it. First time commenting on an internet recipe!
I basically just cut the recipient in 1/2 and threw everything into my bread machine and put on the dough setting. Then formed the dough, put into a bread pan, and let it rise (which it did much quicker than expected). Baked in 425 for 20 minutes.
I’ve been making bread using a bread machine to knead the dough for about 4 years now and this is the softest most flavorful bread ever. This will be my new favorite “go-to” recipe…thank you, thank you, thank you!!
annisa
Well, you just made my day! YAY! Glad you enjoyed it!
Tracy Edwards
Sounds delish and I can’t wait to bake it but first I need to know what kind of yeast you are using? Instant/Rapid/Bread Machine OR Regular/Active OR …? Thanks so much for the recipe!
annisa
Hi! I am using Red Star Active Dry Yeast. I buy it in bulk on Amazon. Good luck!
Jessica
Have you tried using bread flour? I am a newbie and tried a recipe that was pretty good. I am going to try yours next. I am going to try bread flour instead of white 😬
annisa
Hi! Yep! The batch that is currently in my freezer was made with half bread flour and half whole wheat flour. I’ve found that if I have any factors stacked against me in terms of my bread rising (house is chilly, hard water, etc.) then the bread flour helps out tremendously. I have not made it with all bread flour though. It would probably be a lot lighter, as the whole wheat flour tends to make for a denser bread, in my experience. Good luck! I hope it turns out well for you. Keep practicing and tweaking it until you find a combo that you like!
Ang604
LOVE this recipe and make 3-4 loaves a week for family and friends.
I add an EXTRA ..3/4 cup of seeds to my recipe ( 1/4 quinoa/ 1/4 hemp and 1/4 flax ) and water is 2 + 1/4 cups .
I only use 2 cups of whole wheat and 2 cups of white flour .
Seed mix can be varied I just love that extra 1/4 cup of quinoa especially.
I don’t brush them with anything and bake it in a 380 oven for 25 min .
Use canola oil instead of coconut.
Thanks for an amazing recipe I just wanted to share how I switch mine up a bit!
Just an FYI ..I use a Breville bread machine as it holds this entire recipe but ONLY to make dough in it . So after 1 hour on dough setting I remove dough and bake in two loaf pans.
It’s a good enough machine that this recipe doesn’t seem to stress the motor.
annisa
I LOVE that you switch it up! Recipes should be adaptable to ingredients and our tastebuds. It’s fun, isn’t it? Awesome tip about the bread machine too. That will come in handy for someone, I’m sure. Now you me hungry! xo, Annisa
Anna Marie
I’m not a joiner/ subscriber normally so this is so out of the normal for me to sub to anyone, Annisa. I say a prayer for you every time I eat a slice of this bread- it’s so good, words fail me- REALLY.
I fell in love with Dave’s bread from the grocery store months ago when I picked up a few loves on sale. But man, that stuff is expensive here and with everyone sheltering in place now, the bread isle is a war zone. I found your recipe online and wow! It’s even better than Dave’s! Yes, it’s that good.
I thought, now, what can I do to show that girl how much I appreciate her for sharing this recipe? So, like I said, I pray to the Lord Jesus Christ to bless you and your family.
Thank you so much for sharing this recipe. It is life changing…
Anna Marie
annisa
Thank you so much! We will always take extra prayers – that is so kind of you. As a side note, your description of the bread aisle is so true. I am so glad you enjoyed the recipe and thank you for taking the time to tell me. That just makes my whole week. Blessings right back to you. Stay safe and healthy.
Jennifer
Have you done this recipe using dough cycle on the bread Machine?
annisa
I have not, but most of the other bakers who have made this recipe seem to use the dough cycle on the bread machine to do the heavy lifting! It seems to work great! Definitely go for it if it makes your life easier!
Anna Marie
That bread is a meal all in itself! Love it, love it, love it! Thank you, again. God bless Annisa.
annisa
Best message to wake up to! Glad you enjoyed it…just had my morning slice!
Neha Mittal
Hi can I omit the steel cut oats and just use regular rolled oats
Florence Sadler
Thank you for this bread recipe. It turned out well. I had to use the extra water because I live in dry Utah. Merry Christmas!
Karen
I’m trying to make COPYCAT KILLER DAVES WHOLE WHEAT BREAD. What ingredients would I leave out and could you please let me know if I would follow your other instructions as written.
annisa
Hi. It is better to start with the original recipe and then adapt after you’ve made it a few times to adjust it to your taste and dietary preferences.
That said, you can leave out the vital wheat gluten. You can also use all regular flour or bread flour instead of splitting the flour between white and whole wheat. You can also leave out steel cut oats and just increase the regular oats, or vice versa. The recipe really is adaptable as long as you keep the ratios the same. If you don’t keep the ratios the same, you’re probably going to be off in terms of how sticky or dry the dough is and that’s going to impact your ultimate outcome, if that makes sense. Good luck!
Tami
Do I need to cook the quinoa first? Or does it do its thing while baking?
annisa
It does its thing while baking. No need to cook first. Hope you enjoy the recipe.