Braided Denim Pumpkin
I have these illusions that I’m an unique, one-of-a-kind, broke-the-mold sort of person.
But I’m really just like most people. In fact, I’m just like the MILLIONS of other crafty people in the world who have fallen down the rabbit hole known as The Dollar Store and emerged with a styrofoam pumpkin.
Okay, okay. I have six Dollar Store pumpkins. Six. But that’s all, I swear.
And you can’t just buy a Dollar Store pumpkin and be done with it. Nooo. No way. That’s against the code. Something crafty must be done with those Dollar Store pumpkins or you develop an eye twitch and bad luck for 7 years.
Or so I’ve heard.
I decided my Dollar Store pumpkin was a good candidate for a denim makeover. If you’ve been reading this blog in the last few months, you will know I have been repurposing Handy Husband’s old jeans. I’m determined to put this material to good use and this might be my favorite project until the next one yet. (I say that every time!)

To make a braided denim pumpkin, gather up your supplies: old jeans, styrofoam pumpkin, scissors, hot glue gun, needle and thread.
Then you’ll begin the most gratifying part of this project – cutting up a pair of jeans!
It feels a little naughty the first time you do it. Then, it’s sort of empowering. Like you are a superhero saving the entire neighborhood from an accidental flash of your husband’s boxer briefs from the blown out crotch in his jeans saving the planet by repurposing an item destined for the landfill.
You’ll be cutting the jeans into long, thin strips. I pretty much winged it because this is not a project you should over think. It’s a Dollar Store pumpkin, not the Mona Lisa. My strips were approximately 1/3-inch wide by 10-inches long.
I’d say this project took a good chunk of the right leg of this pair of relaxed-fit jeans. Plan accordingly if you are working with skinny jeans.
This next part may or may not have been necessary. It’s just what happened while I was winging my way through the process. Since I didn’t want my braid to come unraveled before I attached it to the pumpkin, I held the 3 strips together and secured them with a couple of stitches of blue thread. I probably could have used hot glue, but this just seemed easier and less glue-stringy at the time.

Then I braided the denim and secured the other end of the braid with a few more hand stitches.
I repeated this process about twenty or so a million times.

The last part of the process was to hot glue my braided strips onto the pumpkin.
I did not want to add bulk to the bottom of the pumpkin, so I never glued an end of one braid on top of another braid. No overlapping, I did get the braids as close together as I could though to hide the orange styrofoam.
As the gaps between the glued-on braids started to close, I ended up cutting my braids to size because I didn’t need the final braids to be as long as the ones I started out with.

My original intent was to trim the very first and longest braids to fit close to the stem. However, I decided I liked the curly-Q effect, so I left a few.
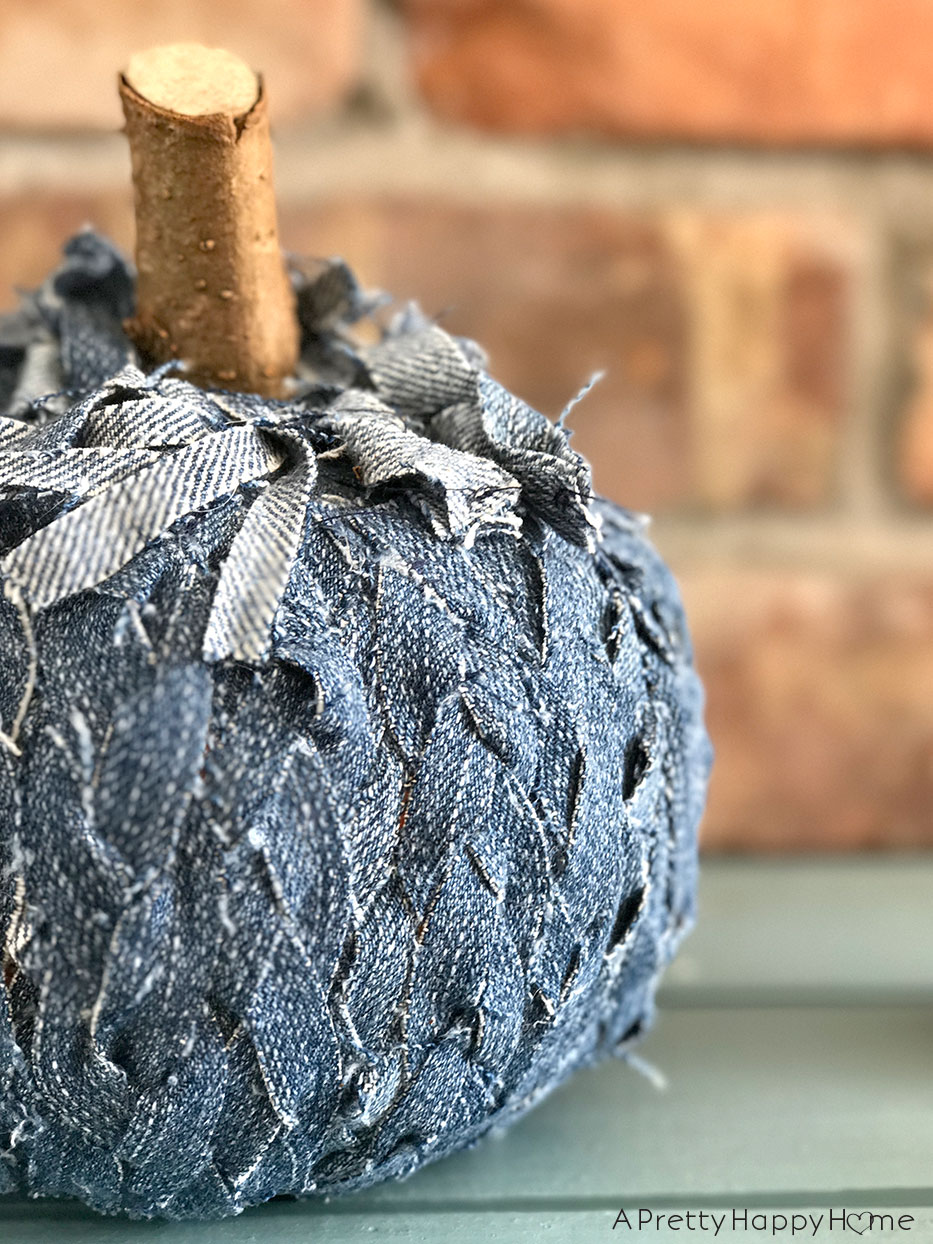
Here’s how it turned out…

I also gave this faux pumpkin a stem upgrade! It’s super easy! I used a craft knife to cut off the styrofoam stem.
It turns out the pumpkin is hollow! That’s one mystery solved.
Then I shoved carefully inserted a branch into the pumpkin to act as a stem. I had intended on glueing the branch in and may need to in the future as the styrofoam breaks away, but for now, it doesn’t need it.

I love the texture the denim braids provide.
And since denim goes with everything, this pumpkin works with a variety of color schemes.

I’m smitten with this pumpkin. Absolutely adore it.
Beyond that, I’m happy I took an hour of “me time” to sit down and create something pretty for my home. This time it was a braided denim pumpkin. Next time…who knows?
Woohoo! This has been fun! Ready for another?
Denim Striped and Flower Petal Pumpkins


21 Comments
Dawn Olsson
I like it!
annisa
Thank you!! xoxo
Sandy Smith
You are so clever! I love the denim pumpkin. I can’t beleive it only took you an hour. It would take me a lot longer to get it braided and glued correctly on the base pumpkin. I’m looking forward to your next creation.
annisa
Thank you! It really went pretty quick once I got going! But, I’m not a perfectionist, so that makes things move forward much more quickly. Ha!
Pingback:
Claire PillarboxblueClaire
I came across this at Funky Junk Party. I love your denim pumpkin. Personally I think you can make almost anything out of old-jeans, well that is my life’s ambition to try. I’ve done denim Easter eggs before but you beat me to the pumpkin. The braiding idea is very clever and your pumpkin looks great. I’m pinning this to my denim board. Love your writing too very witty, it did make me chuckle.
annisa
Thanks, Claire! I actually have your site on my reading list, so I consider this quite the exciting moment!! Love all your denim ideas!
Pingback:
Pingback:
Pingback:
Pingback:
Pingback:
Pingback:
Pingback:
Pingback:
Pingback:
Pingback:
Pingback:
Pingback:
Pingback:
Pingback: